

Several years ago I was fascinated with 3D printing. I read up on the tech and got excited then I looked at the price of the equipment and was disappointed. I would be mesmerized by videos of extruders carefully laying out an object and dream of the day I, too, could summon objects created from my own design.

After some waiting, a device came out that had a fabulous price, with the caveat that it was a very small print bed. – about half the width and half the depth (and half the height) of the commercial models available at the time (at three times the price). The incredible price was the product of three distinct strategies on the part of the manufacturer. One was its triaxial design that rendered objects on a round bed – it needed one less stepper motor than the average unit. The second strategy was the use of the absolutely cheapest Chinese parts. The genius third strategy was to simply not include superfluous elements – like a power switch.
Over the two years I used this machine, I replaced every part on it, save the frame which was modified gently. I bought improved, quiet stepper motors, installed rubberized mounts for said stepper motors, replaced the bearings, the belts, and even the motherboard. The quiet and relatively reliable device that did its own bed alignment routine was a far cry from the original printer. In the process, I printed several kilos of plastic into a great variety of shapes, and even designed and printed a few things on my own. After this period, I had gained what I would consider a yeoman’s understanding of 3D printing. I could model, render, slice, and print an object from idea to plastic, and troubleshoot anything that happened to the printer along the way.

But then we moved and things were crazy and money was really tight and there wasn’t really a place to put the printer, so it sat in the garage for one year, and then another year. When I finally pulled the printer out of the box and set it up, I was able to crank out a grody looking chess pawn. After some investigation, it was clear that the plastic elements I had printed to stabilize the printer had deteriorated and needed to be re-built. It was about this time that I got some bonus money and could actually spend it on myself – frivolously! So I put the old tripod back in the box and ordered a new Ender 5 S1 from Creality. I had lusted after the Ender 5 when it first came out, but its price was out of my reach. Now, its regular price was easily achievable – and it was on sale!
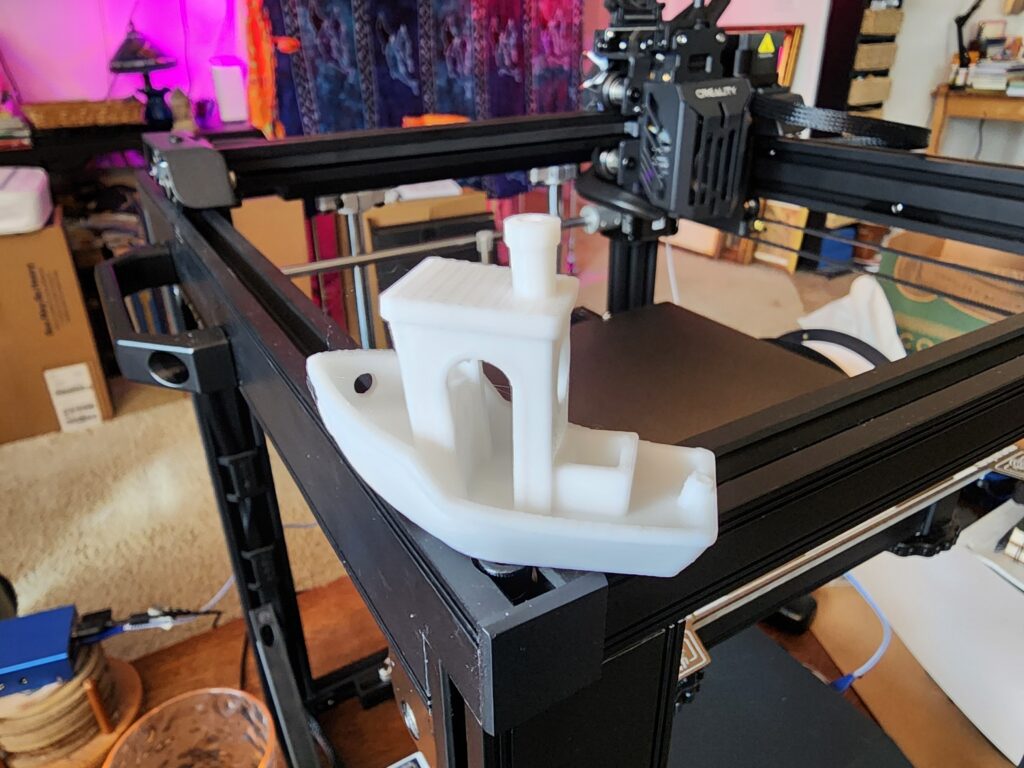
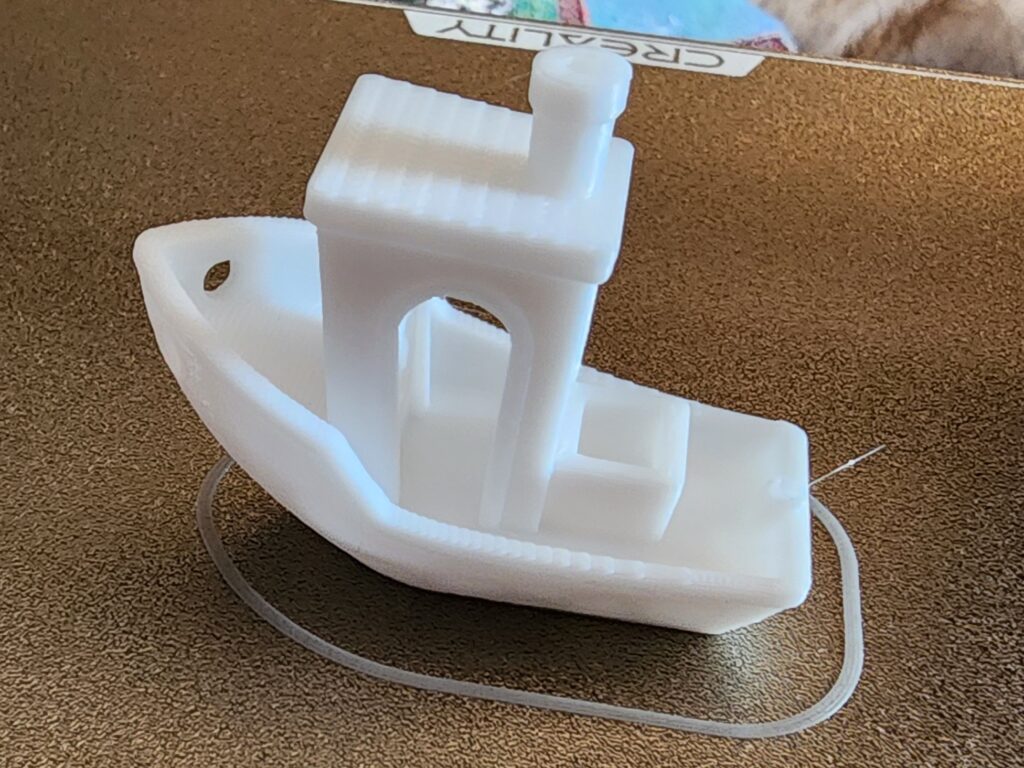
The device came as a project to be assembled, like a shelf from Ikea. My experience rebuilding my first printer meant that I was completely confident in my ability to follow directions and put this together. Everything assembled as expected, but the first few attempts to test print were thwarted until I saw a video on how to level the bed. Boom! Out came the nicest, cleanest “Benchy” I’ve ever printed.
Project File #1: 3D Benchy

3D Benchy
3DBenchy is a 3D model designed by Creative Tools specifically for testing and benchmarking 3D printers. This is frequently the first model printed after configuration or repairs to test the printer’s capabilities.
- Make Date: March 4th, 2024
- Dimensions (mm): 60.0 x 31.0 x 48.0
- Materials: white Monoprice PLA
- Extruded: 14g, 4.15m
- Print Time: 1 hour 27 minutes


The very next thing to print was stress test benchmark object, about eight inches square and covered in components designed to test a series of common printing problems, from stringing to bridging to overhangs. The result was remarkable, even without any particular effort on my part to slice the object in high resolution.
Project File #2: All-In-One Printer Test

All-In-One 3D Test
This test includes : support test, scale test, overhang test, hole test, diameter test and bridging test.
- Make Date: March 5th, 2024
- Dimensions (mm): 100.0 x 100.0 x 60.5
- Materials: white Monoprice PLA
- Extruded: 51g, 15.22m
- Print Time: 4 hours 42 minutes


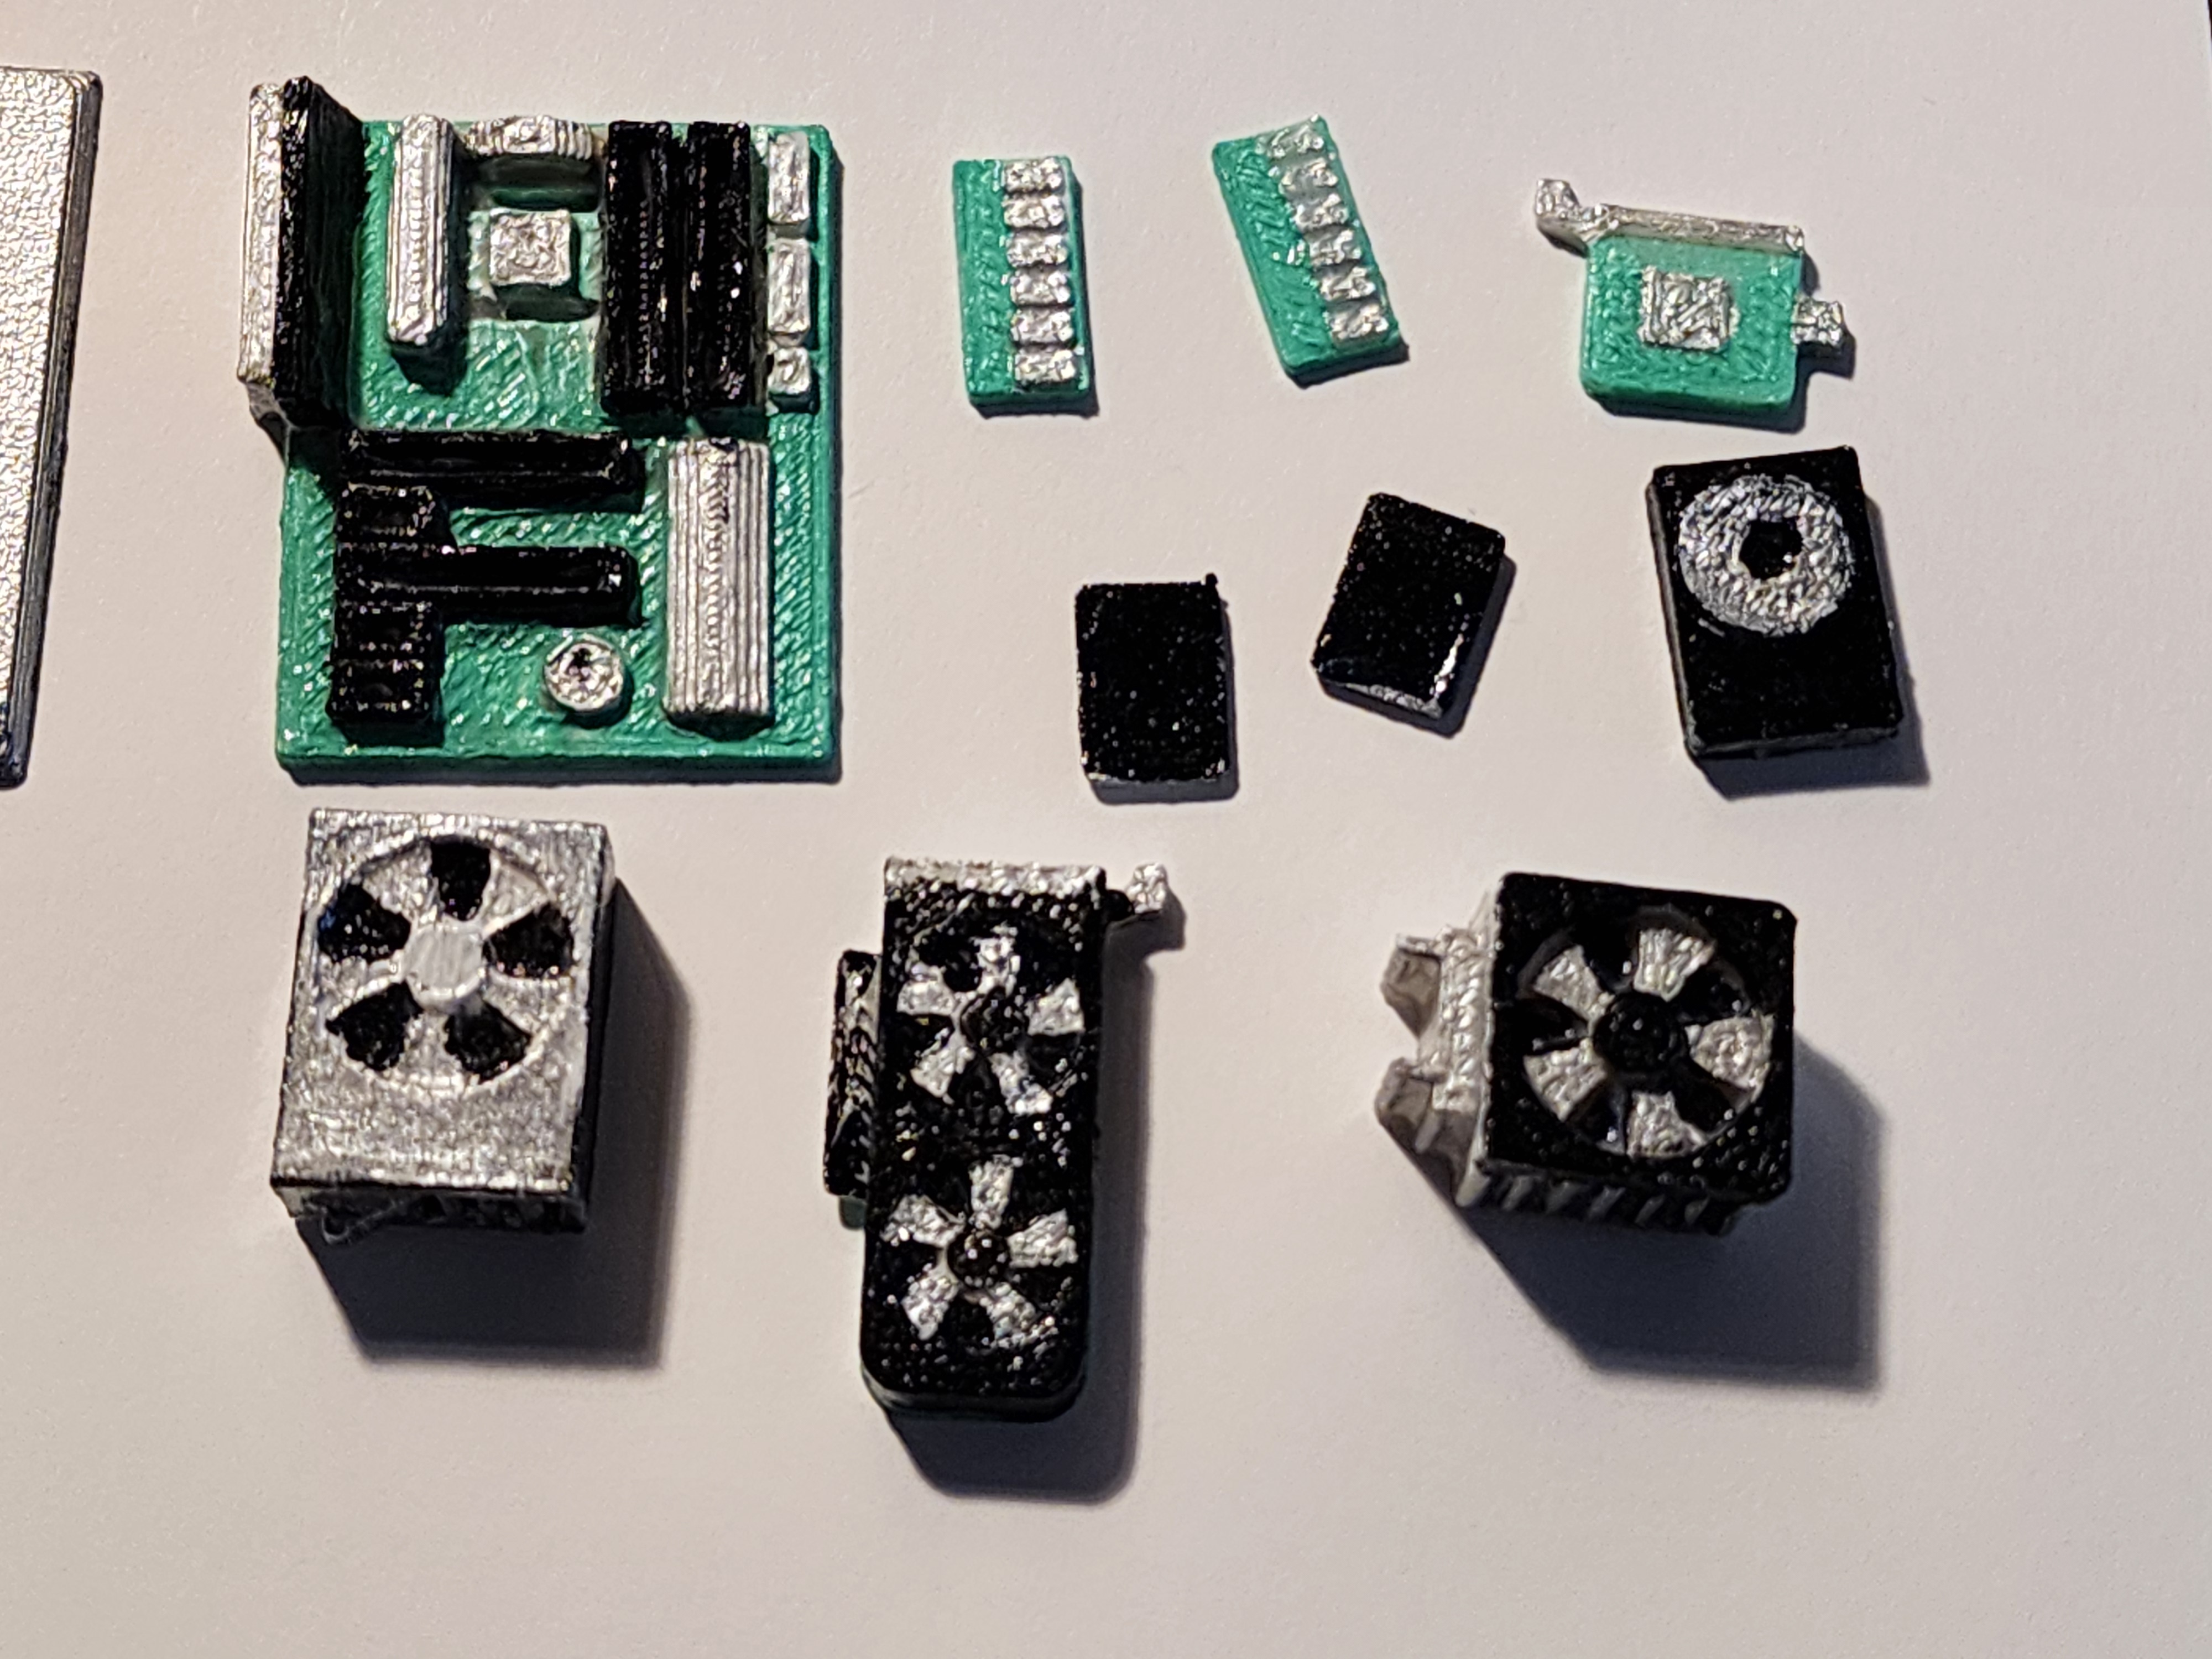
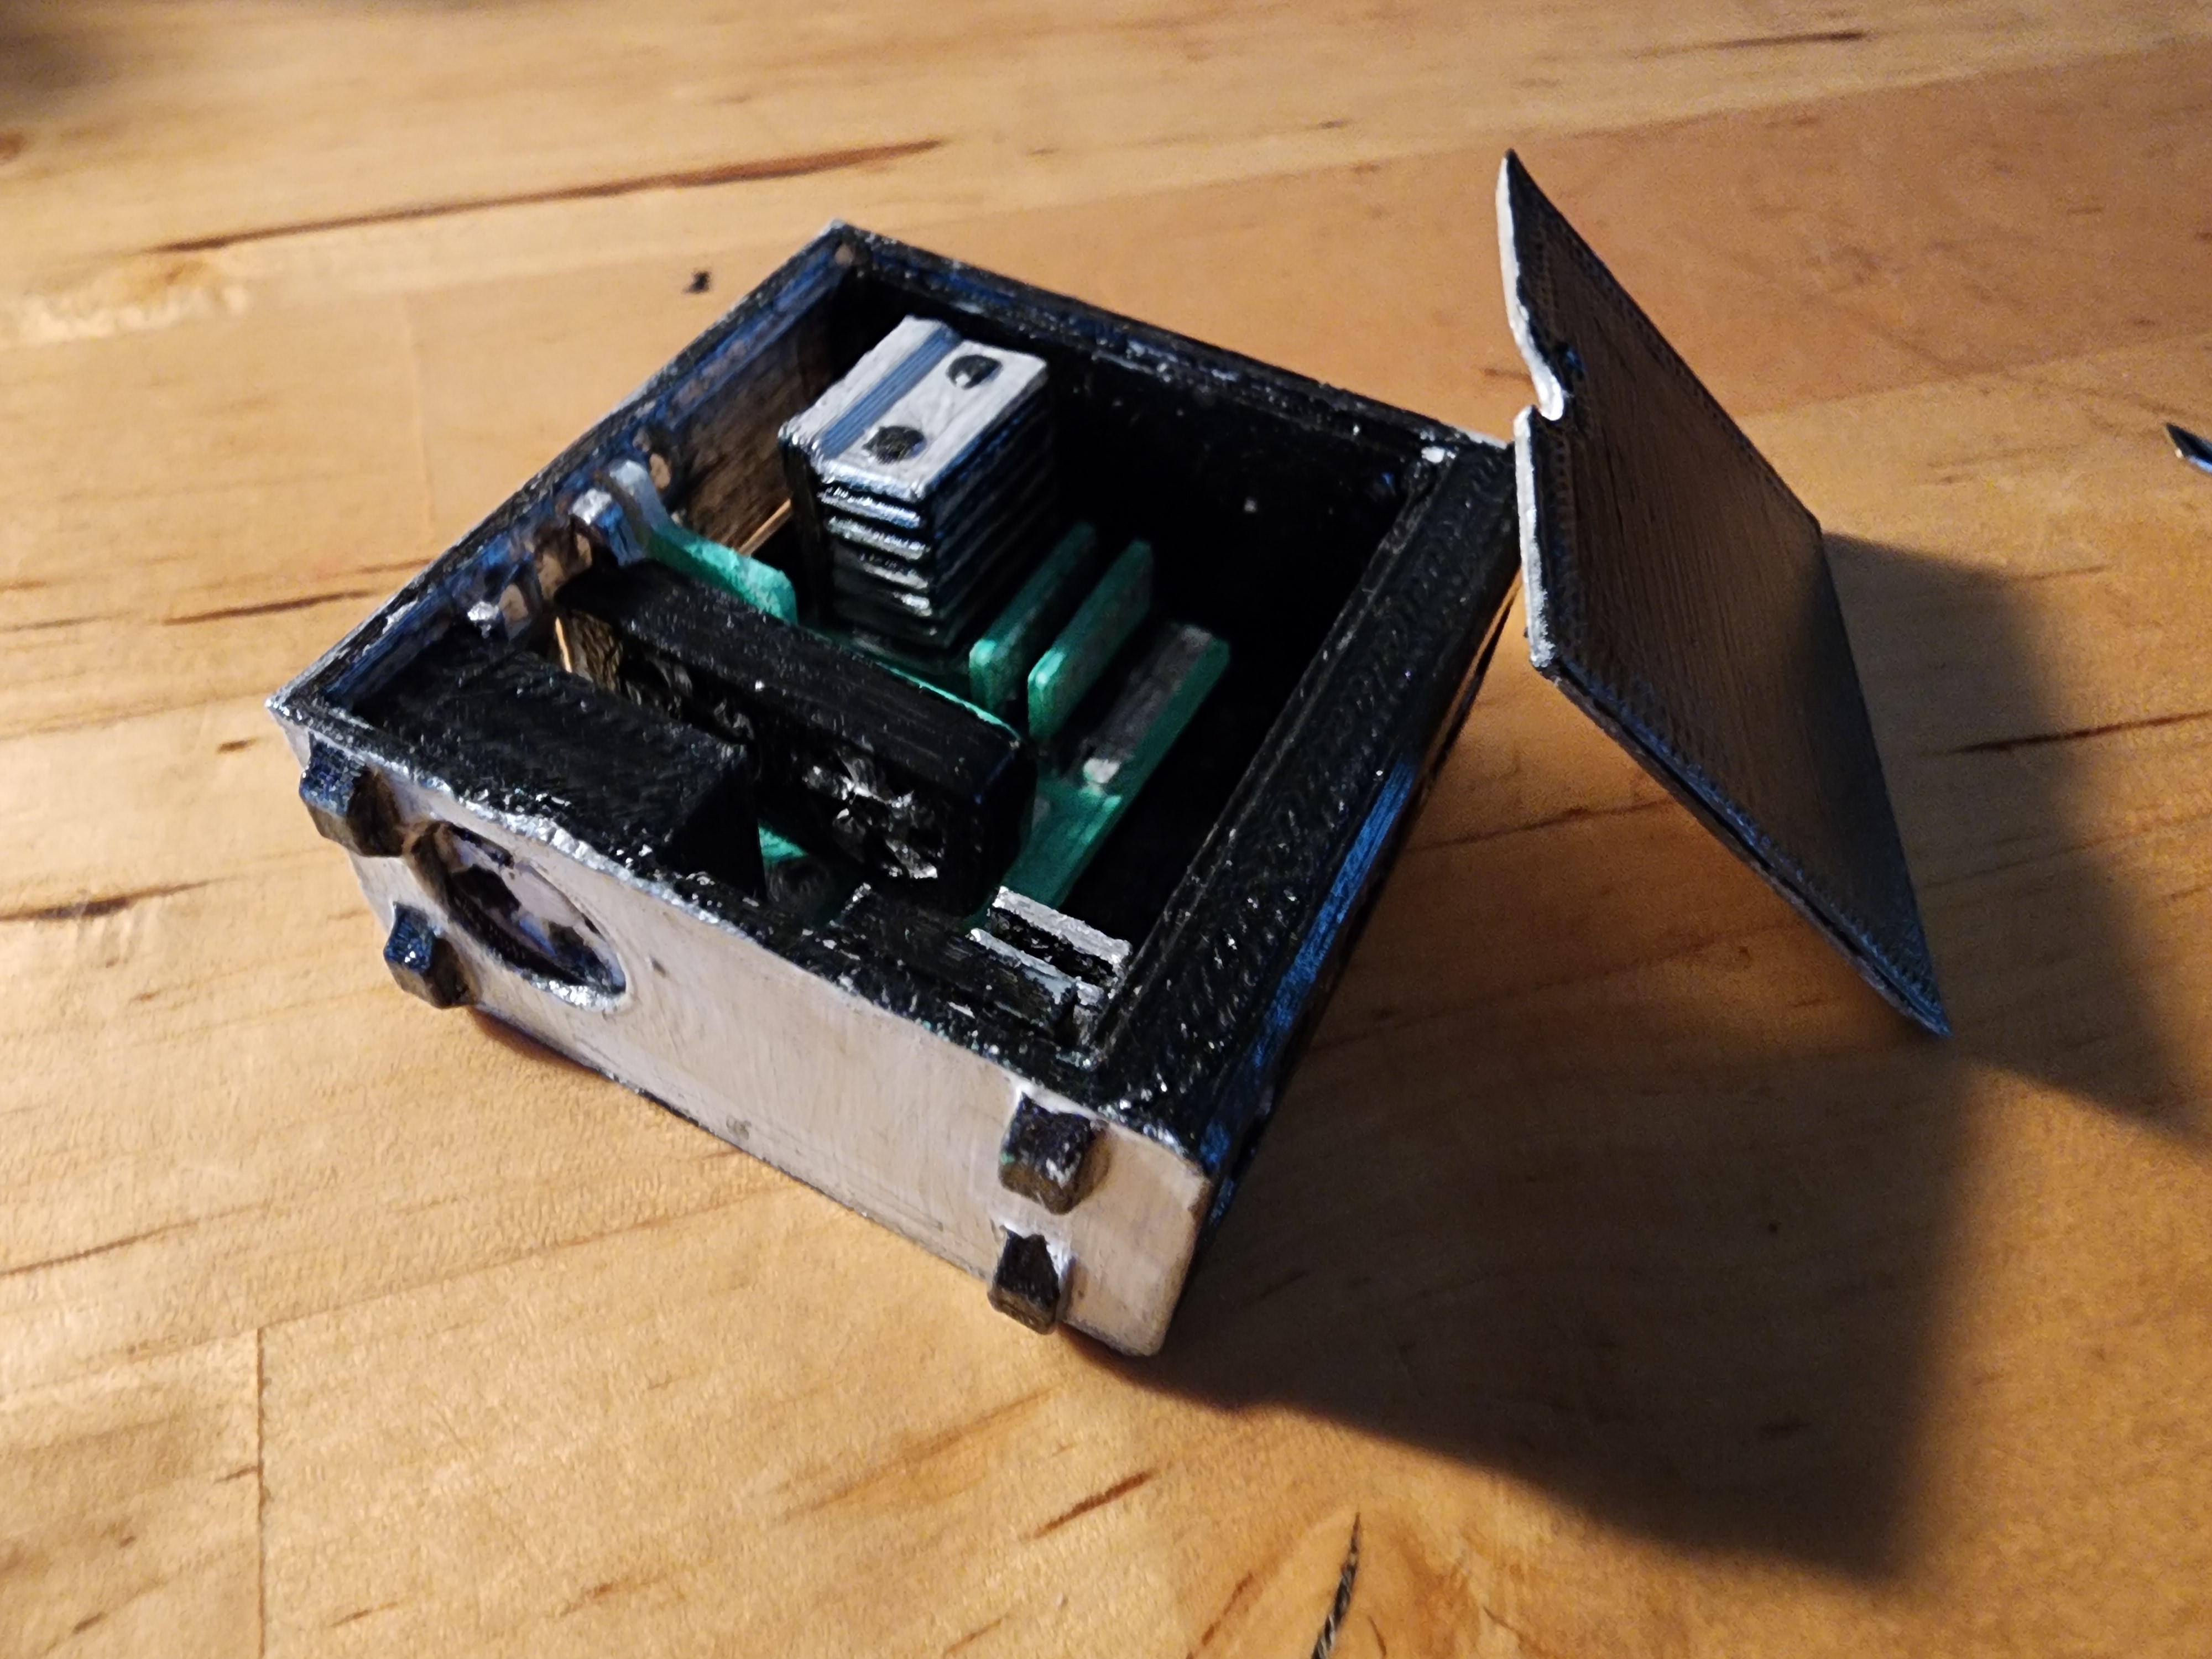
For my first non-benchmark print, I printed a tiny desktop computer model that stands about 2 inches high and has a whole raft of internal parts. I have since painted the model, and the result was pretty great. Small detail doesn’t seem to be a problem with this device, although a resin printer probably would have rendered them even nicer. I packed this up and sent it as a gift to my son, who had built my current system for me.
Project File #3: 1:10 scale PC
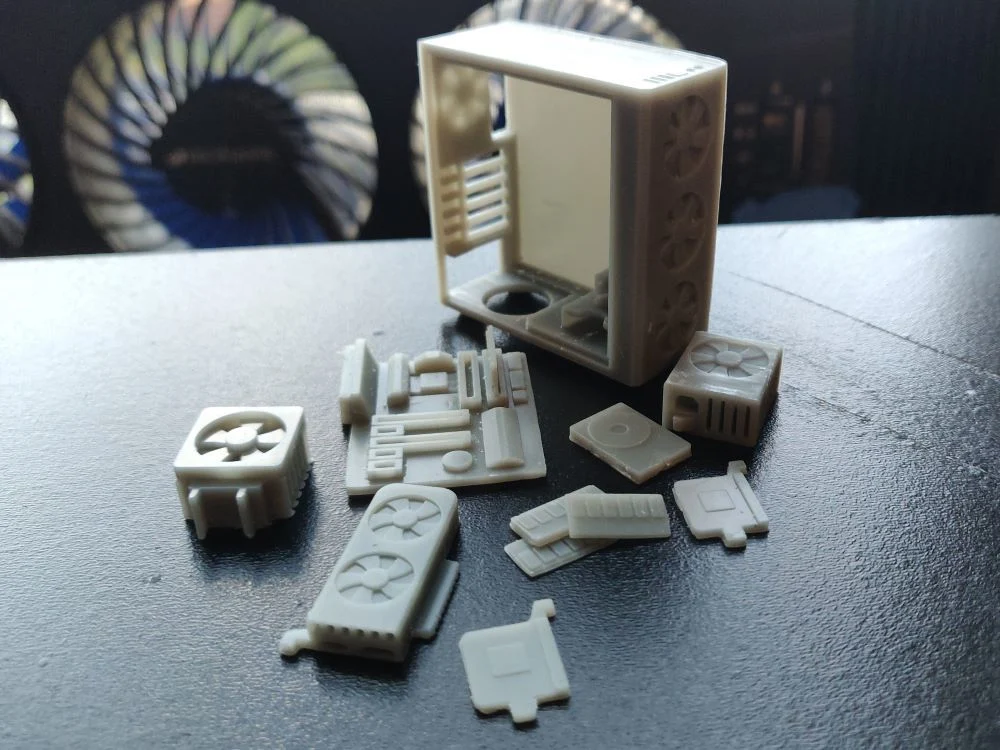
1:10 scale PC
A very small pc with internal components
- Make Date: March 5th, 2024
- Dimensions (mm): 95.0 x 99.5 x 20.8
- Materials: white Monoprice PLA
- Extruded: 26g, 20.83m
- Print Time: 5 hours 21 minutes


When I bought the printer, because it was on sale, I bought the sides and top that go with it. After reassuring myself that this device was capable and functioning, I attached the sides and added the top. Around this time, I also received my shipment of PETG filament, which prints at a higher temp than the PLA I had always used before. The new printer promised to handle this with ease.
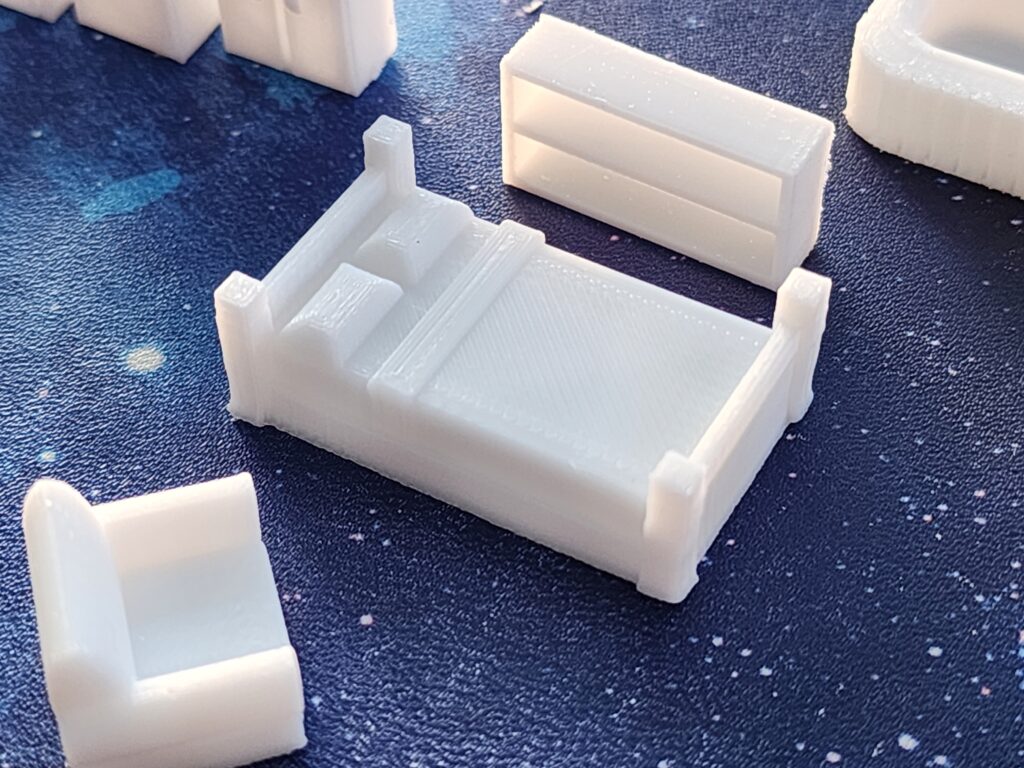
For my next adventure, I found a tiny dollhouse, with a raft of tiny furniture. I was so pleased to have this giant build space that I put all the furniture on it at once and tried to print the whole thing out in one go, but that failed spectacularly. Most of the pieces printed without any effort on my part, but the wee toilet and standing sink required supports and special love, so they were printed by themselves.
Project File #4: Tiny House

Tiny House
“This is a small dollhouse that I designed for my daughter so she would have a little something for the road! A bonus that was unplanned is that this fits the Mini Polly Pockets perfectly!”
- Make Date: March 7th, 2024
- Dimensions (mm): 75.0 x 86.0 x 108.0
- Materials: furniture in white Monoprice PLA, house shell in white Hatchbox PETG
- Extruded:
- furniture – 35g 10.64 m
- house shell – 108g 32.6m
- Print Time: 16 hours 21 minutes
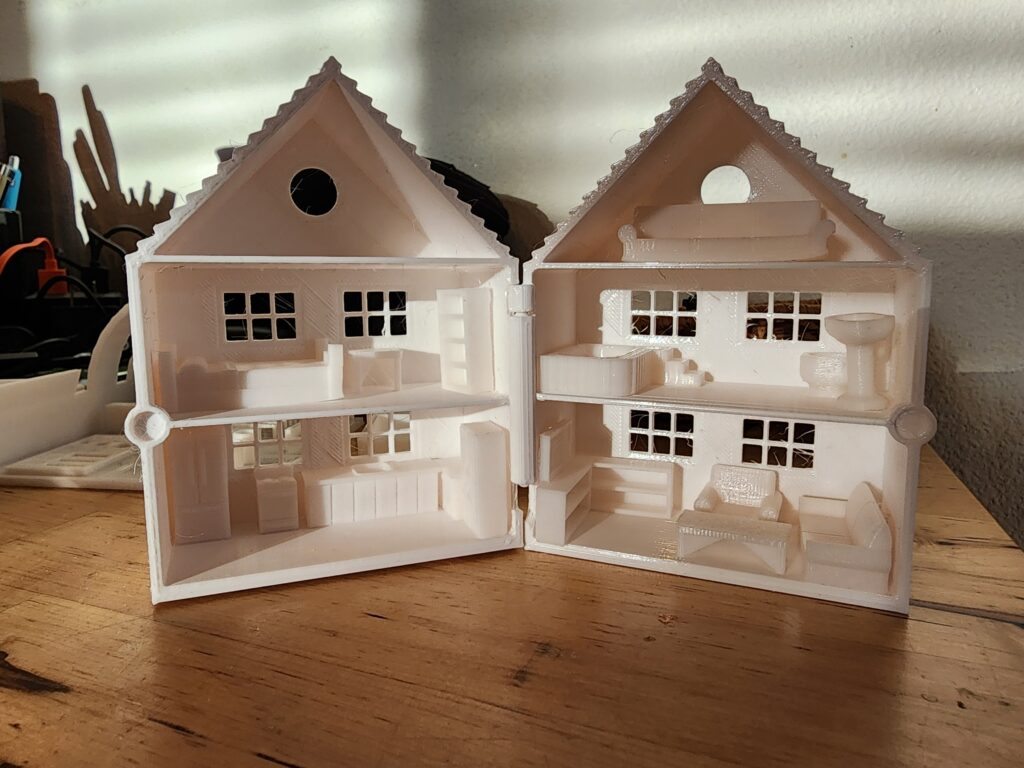


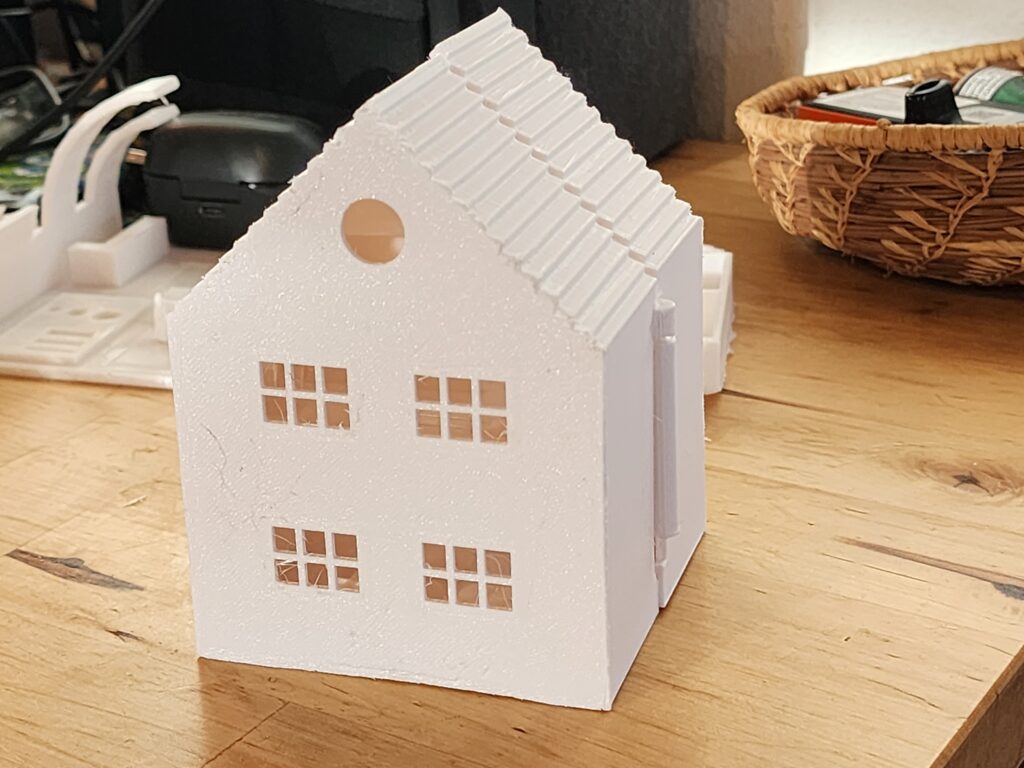


My first attempt at printing with PETG was when I put both sides of the house shell on the bed at once. I thought this had printed well, but something had happened about mid-way through and caused the shells to each split into two pieces. I started to glue the pieces together but realized that the shapes were distorted and weren’t square, much less would they fit together! The model distortion convinced me to keep the lid on the printer and I had few model distortion problems after that.
The house shell was printed out in PETG in two different runs. The results were square, but there was enough distortion that the hinge connecting the shells didn’t match up. This was disappointing but not really worth burning more plastic to fix. I took a lot of photos, then packed everything up as a gift to a friend who liked to decorate dollhouses.
My next project was a reprint of an old project. One of my more successful projects on the old printer was a reproduction of an 1960’s East German sedan. I printed it a few times and painted a couple of them. Of course, then I only had PLA and had to paint my tires black. This time, I had white PETG for the shell and black rubber TPU for the tires, and I was excited to have real rubber wheels on my model.
Project File #5: Pony Toy Car

Pony Toy Car
A reproduction of a 1960 Trabant, an East German automobile.
- Make Date: March 10th, 2024
- Dimensions (mm): 94.9 x 125.8 x 37.2
- Materials: car body, white Hatchbox PETG; tires and wheel, black Hatchbox TPU
- Extruded: 39g, 11.79m
- Print Time: 4 hours 56 minutes

Printing the shell was an educational experience in which I learned the effect of having very fast stepper motors – you get violent, rapid movements! I had to reslice my models to include a significant amount of support just to keep everything in place during the job. After a second attempt, I was able to get the car shell printed and everything looked really nice. Then I switched materials to put the rubber filament in – it was like feeding a noodle into the filament tube. The model had to be sliced for the temp and speed of the material, but I put all four tires on the bed at once, throwing caution to the wind. They printed out great. They looked and felt like real rubber.
One of the never-resolved issues of the first printer was a fundamental paradox of 3D printing. In order to get a good print, the model must stay affixed to the print bed, but after the job is done, you want to get the model unfixed from the bed with as little damage to the model and the print bed as possible. After experimenting with several different bed materials, I finally ended up with stick glue on a glass bed. The first layers would stick great, but I would need a paint scraper and a mallet to get the models off. The new printer has a 3mm thick, PEI coated steel bed that grips to a plate-sized magnet beneath it. When heated, it grips plastic like glue, but when it cools, it naturally releases the model. If I’m in a hurry, I can lift the steel bed off the magnet and with a gentle bend pop the model off.
Except when I print with TPU rubber, in which case the model must be peeled off the plate. Because rubber.
The next project was a gift for my wife Rainy, who has long had a deep passion for Keanu Reeves. I found a wall decoration with a scene from a John Wick film, and it prints in four parts. I hooked up some black PLA and, because of the dimensions of the job, discovered that I had some heat loss along the door panel when that side of the model warped during printing. I stopped everything to get some self-adhesive weather-stripping and blocked off all the vent holes. The remaining panels printed without a single issue, and the first panel reprinted perfectly.
Project File #6: John Wick

John Wick
An image from a favorite action figure.
- Make Date: March 11th, 2024
- Dimensions (mm): 400.0 x 400.0 x 2.0
- Materials: black Monoprice PLA
- Extruded: 180g, 54.05m
- Print Time: 17 hours 31 minutes


One of the PETG colors I got was copper, and my experience with metal-infused plastic is that it behaves differently than regular plastic. I found a cute model of a playground shovel, only operated by a person’s thumb and fingers. I printed the entire thing in copper PETG. Besides being stringier than the other plastic (meaning I need to run the copper at a lower temp next time), it looked and worked out great. The model assembled up as designed, but it wasn’t very satisfying on the table. Maybe in a sand pile it would work better?
Project File #7: Fingerdigger
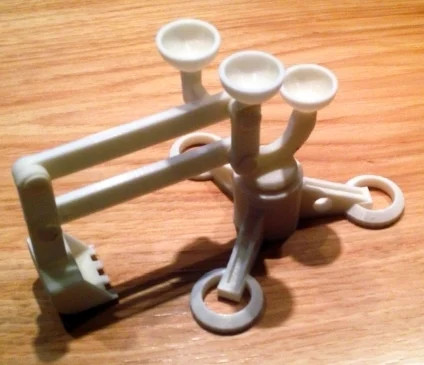
Fingerdigger
A desktop version of a popular sandbox toy. With your fingers at the controls you can seek fossils in your potted plant, dig cigarette butts from full ashtrays, even transfer sake from one sakazuki to another.
- Make Date: March 12th, 2024
- Dimensions (mm): 114.8 x 142.2 x 62.0
- Materials: copper Hatchbox PETG
- Extruded: 44g, 13.32m
- Print Time: 4 hours 36 minutes


By this point, I’ve printed nearly half a kilogram of plastic on the new printer and notice a peculiar tendency for the printer to just work the first time and not fuck up. The prior printer had trained me into a long period of cleaning and touching and checking before and after every print and still having to deal with models that weren’t supposed to look as if they were designed by Picasso or Dali. After I learned the bed leveling process, the new printer reliably generated model after model with a minimum of attention from me. Very often, the most I would do is remove the old model and sweep off the bed before starting on the next print. As reliable as a photocopier or laser jet printer!
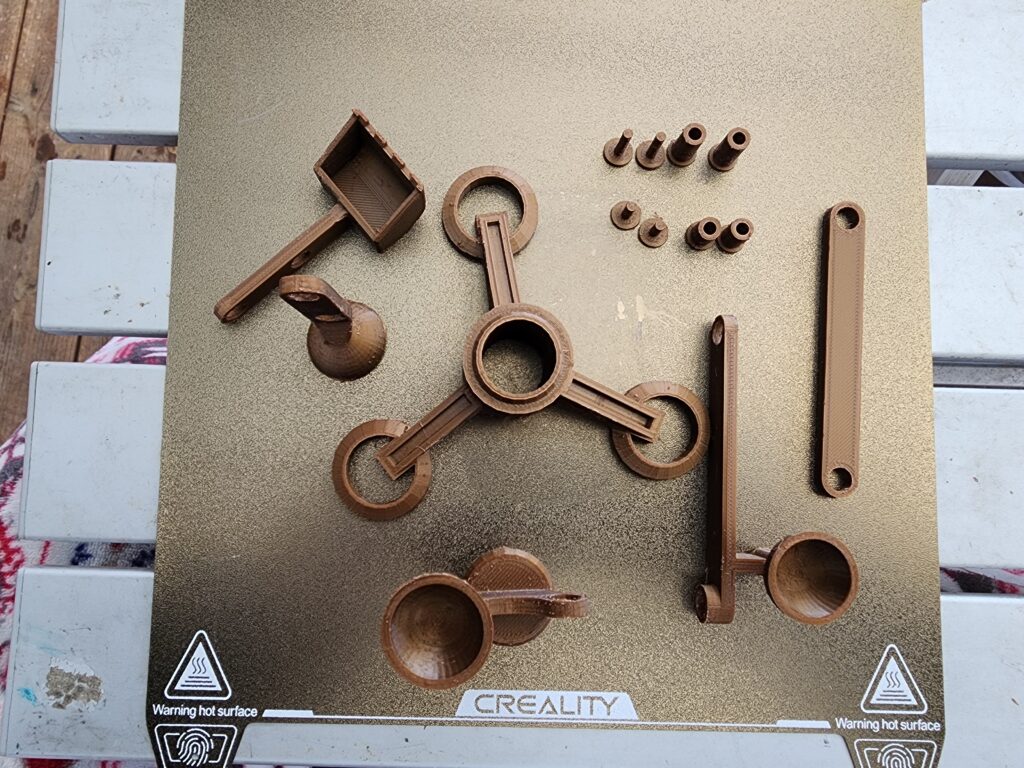
A recurring frustration with the old printer was its limited size. Again and again, I would set aside projects that I really wanted to do, but didn’t have the bed size to accommodate one or more pieces. Now I reviewed my collection and picked a desktop watchwork model that demonstrated the escapement action used in wristwatches to gradually release the tension of the main spring. None of the individual elements were over large, but two of the largest pieces – a gear and a spring, were just slightly too large to print. With other models, I might have just resized the parts, but this one required specific sized screw holes.
Project File #8: Clockwork Model
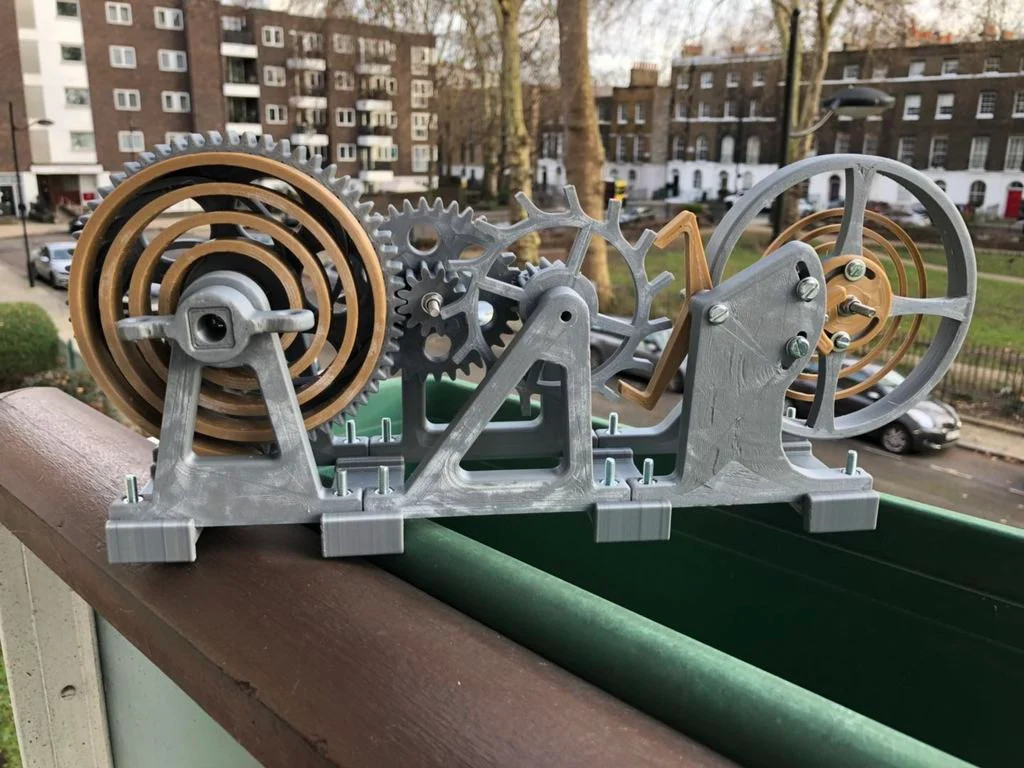
Watch Escapement
This is a basic model of a swiss lever escapement, it could also be used as a desk toy. I have always been fascinated by the inner workings of a mechanical watch, I have designed this model to understand the basics of how a watch regulates it’s speed.
- Make Date: March 19th, 2024
- Dimensions (mm): 325.0 x 80.0 x 165.0
- Materials: black Monoprice PLA, gray Monoprice PLA, copper Hatchbox PETG
- Extruded: 345g, 104.03m
- Print Time: 36 hours 2 minutes


I printed the framework elements in black PLA. The gearing pieces were printed with gray PLA. The two springs were printed with the copper PETG. I noticed a strong odor of burning plastic with the last print, and although the print completed admirably, a quick inspection revealed major problems. The area of the extruding element that heats up the nozzle is called the “hot end” and it’s where the nozzle screws in and the plastic comes out. It’s covered in a silicone “sock” that is made to fit snugly around it. When I looked at mine, the sock had a small tear at the nozzle which had allowed copper plastic to get in under the sock and completely cover the hot end and the wires that connected it. The whole hot end was borked.
This was the end of the first hot end.
Forty dollars and five days later, I had a shiny new hot end assembly, along with five new nozzles and five new silicone socks, because I’m not playing around with any more torn sock stupidity. I watch a video produced by the printer company that shows how to replace the hot end and get to work. All the needed tools had come with the printer, so it was only minutes before I had the nasty hot end removed from the frame. I went to remove the plugs, like it was shown in the video, but didn’t realize there was hot glue affixing them. I tore off one connector and broke another before I realized my mistake.
This was the end of the first connector board.
A quick chat with the customer service folks and a new connector board is on its way. In the meantime, I’ve since learned that it’s standard practice to ship everything with gobs of hot glue on the connectors. I was just supposed to know. When the new board comes in, I should be able to safely remove the old board and put everything back together with relative ease. It’s an extremely well-designed machine with years of user-designed improvements included within it. I feel like I damaged more than I should have in this cycle, but everything will be working great in a week or two.
In the meantime, I spent $45 (!) on the random collection of bulk metric bolts and nuts needed to assemble the clockwork. Everything needed cleaning, and the copper parts were especially stringy. Assembly instructions were on four different PDFs as blowapart views. Everything came together as designed, and it kind of worked, but the angle of the fork rubbed wrong against the balance wheel and I would only get about five or six ticks before it slowed down. Something about the frame pieces may have gotten warped, or they weren’t filed down correctly perhaps. The fact that a dozen other people had submitted variations on the fork and gears makes me think other people had much the same problem I did.
When my printer is working again, those variant gears are the first things to be printed.
Leave a Reply